Yoga Mobility and Stability for Pain
Use a simple formula to help participants manage pain.
Some people don’t attend yoga class solely to get fit. Often, a physician or physical therapist recommends yoga as a safe way to exercise—specifically as a tool for pain management—and people flock to the first yoga class they can find with high expectations. Whether you’re a new yoga instructor or experienced master, you may never have considered whether your class design addresses these needs, beyond the idea that breathwork and flexibility are generally helpful for pain. You may, from time to time, get stuck in a rut and repeat flows. It happens. Or you choose a specific “peak pose” and program your classes around it. You may even feel it’s out of your scope of expertise to design a yoga class with pain management in mind. And while, yes, yoga instructors certainly are not expected to act as doctors or licensed physical therapists (unless they happen to be one), it’s still worthwhile to learn how to program a yoga mobility class with pain management as a guiding principle.
Yoga Mobility and Stability for Pain Management
The main programming goal for this class is to empower participants to use their yoga practice as a key pain management tool—at home and in class.
The Approach
- Gather feedback. Before you create specific sequences for your yoga class, ask participants if there are areas in their bodies where they’re experiencing chronic or recurring pain. In more intimate classes where you’re familiar with your participants, you may already know that Sally has a past knee injury and Greg has chronic lower-back pain. However, sometimes participants can be less forthcoming, or perhaps you teach large classes with new faces every week. Let participants know that you’re creating the perfect yoga workout for them and encourage them to return the following week.
- You can also create go-to sequences for the most common pain complaints, such as the lower back, knees, hips, shoulders and feet/ankles. Many people struggle with joint pain that can be safely addressed through thoughtful movement.
- Do your research. If a participant shares that she struggles with fibromyalgia, for instance, and you don’t know much about that condition, research it to find out if there are ways, within your scope of practice, that you can improve her yoga experience. Perhaps someone suffers from chronic postoperative pain or migraines. Then you can look for poses and breathing techniques that might be especially helpful, and incorporate them into your sequence. You can also draw from your own pain experiences or seek input from friends and family members who may live with chronic pain. Always stress to people who are dealing with serious pain the importance of getting medical clearance before doing yoga.
- Get specific. You will not be able to address every individual’s pain management needs in a single class. However, today’s class can address one issue, your next class can address another, and so on. The process of considering pain management elements is a great way to stay creative, offer variety and provide experiences that translate into improved quality of movement and life enjoyment.
- Follow a formula. It’s important to incorporate mobility work during class and not just hold poses, especially when pain management is a focus. Often, mobility training is limited to sun salutations and transitions. However, increasing opportunities for mobility work and gradually improving range of motion will help participants get warmer, move more easily and mindfully, and experience less pain.
The Formula
Below is a formula you can follow to create yoga sequences that combine yoga mobility and stability training, with examples focusing on the lower back.
Step 1: Begin with a warmup movement.
- Choose a move that easily trains mobility, 4–10 reps each side.
- Progress to stability-focused poses, isometric strength and/or balance, holding and breathing into the pain area. Choose one to three poses.
- Finish with full-range mobility work, 4–10 reps each side.
- Make sure your mobility exercises complement your stability poses and that you move with the breath, similar to the approach used in Pilates. For example, if your stability focus is a static chair pose, start with easy range-of-motion chair squats, then do squats with alternating knee lifts as your full-range mobility work, with participants actively lifting the knee as high as possible.
Step 2: Create a combination.
- Craft sequences by pinpoint-ing the supporting muscles, joints or causative areas, such as tight and/or weak hamstrings, glutes, and hip flexors, which can contribute to lower-back pain.
- The combination should flow in order: warmup with easy-range mobility, then stability poses, then a full-range mobility sequence.
Step 3: Determine the best order of sequences. Typically, instructors tend to favor larger muscle groups so as not to fatigue smaller muscles. However, sometimes you may want to start from the feet and move up the body, prioritizing the kinetic chain. Or think of a sequence that is physically less demanding and progress it to more difficult poses and/or flows.
See also: Improve Your Yoga Teaching Skills
Two Sample Combinations for Lower-Back Pain
Let’s explore how to apply this formula to the issue of lower-back pain. By improving hip mobility, strength and flexibility, you can help alleviate one of the major stressors that contribute to this condition. Following are two examples of the “formula” in action.
Sample Standing Combination: Warrior 3
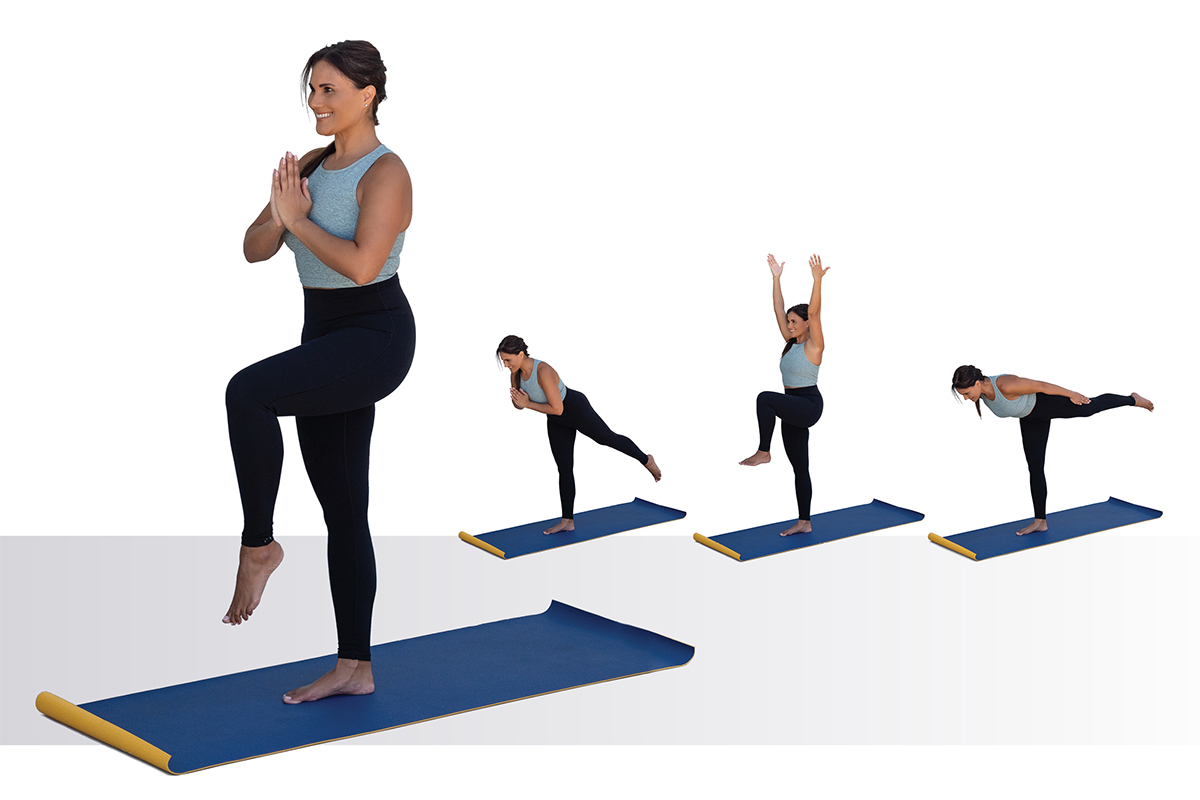
This sequence helps prevent lower-back pain and improves hip stability by mobilizing the entire leg through the sagittal plane, which strengthens the core, hamstrings and hip flexors.
Easy-range yoga mobility:
- After a thorough warmup, start participants in mountain pose.
- Exhale, sweep left knee forward to a 90-degree angle.
- Inhale, sweep L leg back into a low rear-leg lift.
- Exhale, lean torso slightly forward, keeping a diagonal line from head to toe (plantar or dorsiflexed).
- Complete 5 sweeps.
Note: Cue for core engagement and remind participants to avoid rotating hips. Hands stay at heart center, placed on hips, or extended down by side body.
Stability:
- Next, cue participants into warrior 3.
- Arms can stay at any of the previous positions or can be extended to sides, like airplane wings, or extended up, beside ears.
- Remind participants to stand firm and engage quads, glutes and hamstrings while keeping hips aligned. Keep spine long, supported by core.
- Hold for 5 breaths.
Note: Assess participants for ankle-knee-hip alignment, reminding them to ground through all edges of the standing foot and to energize the rear foot.
Full-range yoga mobility:
- Cue participants to rise halfway to 45-degree angle, then repeat sweeps, bringing knee as high as possible.
- Hold for one breath, then sweep L leg to rear, coming into a full warrior 3, if possible.
- Hands stay at heart center or sweep forward and up by the ears on the lift phase, then straight back in a triceps squeeze during the warrior 3 phase.
- Exhale on end ranges and inhale during transition.
- Complete 5 reps.
Recover and repeat:
- Return to mountain pose, stretching calves with some gentle ankle rolls.
- Repeat sequence on opposite leg.
Note: As you take people through the opposite side, ask them to pay attention to any differences. Does one side feel more difficult? Why? Is it weaker, tighter, injured, tired? Encourage them to repeat the sequence on their weaker side, either during class or later in their day.
See also: Yoga for Optimal Performance
Sample Seated Combination: Pigeon Variation
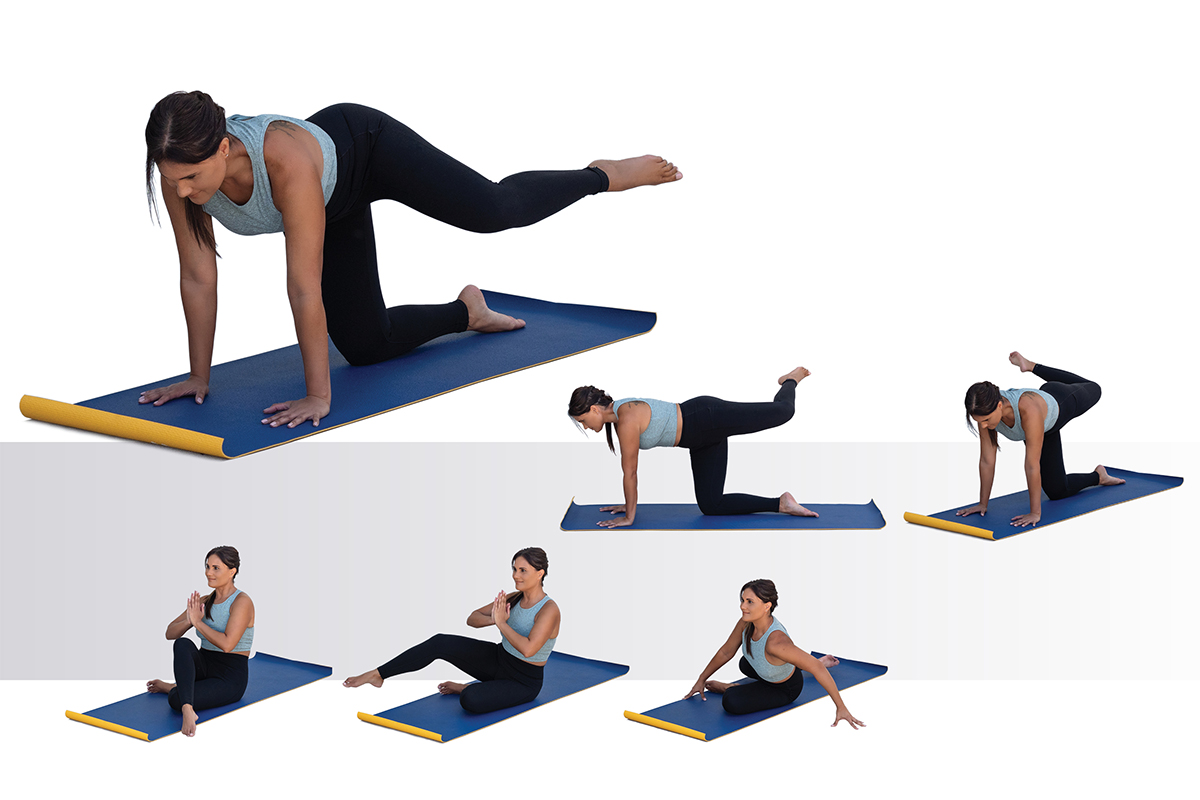
Easy-range yoga mobility:
- From tabletop, lift L leg to the side, maintaining a 90-degree bent knee position, abs engaged. Only lift to the engaged position; don’t push past pain.
- Inhale, sweep lifted leg back in an arc, as if gliding along a tabletop, keeping arms strong (but not locked), spine long.
- Exhale at end range, slightly rotating hip to open more comfortably, then gently return to side hold position.
- Complete 5 sweeps.
Stability/flexibility:
- Bring L knee forward, easing into pigeon pose (not pictured), using arms for balance.
- Lift tall through spine, breathing into R hip flexor and L hip.
- Hold and breathe for 5 cycles.
- Release: Lower chest over L leg, hold and breathe for a few cycles, then widen hand placement, lift chest and sweep R leg forward into a seated position.
Full-range yoga mobility:
- From bent-leg seated position, have participants shift weight more into R leg, lifting bent L leg inches off floor.
- Cross L leg over R knee, tap floor with toe, then lift and sweep back (similar to tabletop sweep), trying to hover leg throughout the movement.
- Exhale at end range, then inhale; return to midline.
- Exhale, bring leg across again to tap toe.
- Repeat 5 sweeps, if possible.
Note: Try to keep hands at heart center. Use hands for balance if necessary, as this can prove quite challenging for those with tight and/or weak hips and core.
Recover and repeat:
- Recover with child’s pose.
- Repeat sequence on other side.
Note: If this full-range exercise proves too challenging for some, have them repeat the easy-range exercise instead, encouraging them to extend the end ranges.
See also: Research-Based Yoga for Seniors
Endless Opportunities
You don’t have to be a pain specialist to help people address and manage pain, although you should always do your research, stay within your scope of practice, and tell participants who have clinical or acute pain disorders to get medical clearance first. The options this formula offers are endless and allow an instructor to break out of a rut and stretch creativity, while guaranteeing effective yoga sequences that help prevent and alleviate pain for class attendees.
Yoga Sequence Cheat Sheet
When creating a pain management combination for your yoga class, use the following formula:
- Identify the area
(for example, lower back). - Determine the key players and supporting actors. (In this case it would be glutes and hamstrings, hip flexors, and abdominals.)
- Create a sequence
(for example, for glutes and hamstrings) that includes easy-range mobility, 1–3 poses for stability, and full-range mobility. - Follow the same approach and create sequences for other key players (such as
hip flexors and then abdominals). - Determine the order, and you have your combination.
Note: When you add a warmup and cooldown, the combination may take up the bulk of your class time (40 minutes). Alternatively, you can minimize it to just one combination (15 minutes), depending on the number of reps and the tempo.